
PSU 2025 Intro CTF - Serinus
- Challenge Name: Serinus
- Challenge Description: The Nittany Lion is my second favorite animal. I love birds more - do you love them too? What? What do you mean you’re trying to get past my beautiful canary??
This is the second of two challenges that I’ve created for the CCSO 2025 Intro CTF, which involves yet another binary exploitation challenge.
In our last challenge, we targeted an x86 ELF binary that was vulnerable to a stack overflow. We properly enumerated the offset of the EIP, adjusted our padding to reach that offset, and created a script that allowed us to exploit the binary both locally and remotely. In this challenge, there’s a lot of the same but with a bit of a twist.
Note that you may see some changes in between this code and the previous challenge’s script. I did learn a few new ways to use the pwntools library since the last challenge - so you may see a few differences in the script (nonetheless I will explain them).
Challenge Overview
In this challenge, we’ll be focusing on yet another stack overflow. The only exception is that this binary includes a stack canary that protects the binary against generic stack overflows (we’ll explain what this is later). We’ll also be abusing a format string vulnerability which will allow us to bypass the stack canary entirely. We’ll then finish by creating a local and remote Python exploit to automate our stack injection process.
For replication purposes, here’s a bit of proprietary information that may assist you if you are trying to work on this challenge after this CTF has ended:
- OS Compiled On:
kali 6.12.25-amd64/Ubuntu Server 22.04 - Compiled with:
gcc -o canary ./serinus.c -fstack-protector-all -no-pie -m32 -z execstack -std=gnu99 - GNU C Library Version:
GLIBC_2.34 - Debugger:
GNU gdb (Debian 16.3-1) 16.3 - Auto-Pwn Programming Language Version(s):
Python 3.13.5(Preferred) /Python 2.7.18
Binary Checks
As with our first challenge, lets perform our usual checks.
└─$ file serinus |
One important thing to notice from this challenge is that we are not provided the source code - only the actual binary itself.
As for our output from our binary checks, we have the following info:
32-bitELF binary- Almost the same properties,
Partial RELROand the stack is executable - Stack canary was found in the binary
Decompiling + Program Enumeration
Since we do not have the source code, let’s toss it into Ghidra to examine each of the functions. We could also do this directly in GDB, however Ghidra decompiles the binary and actually gives us visualization into what the source code would look like in its base form.
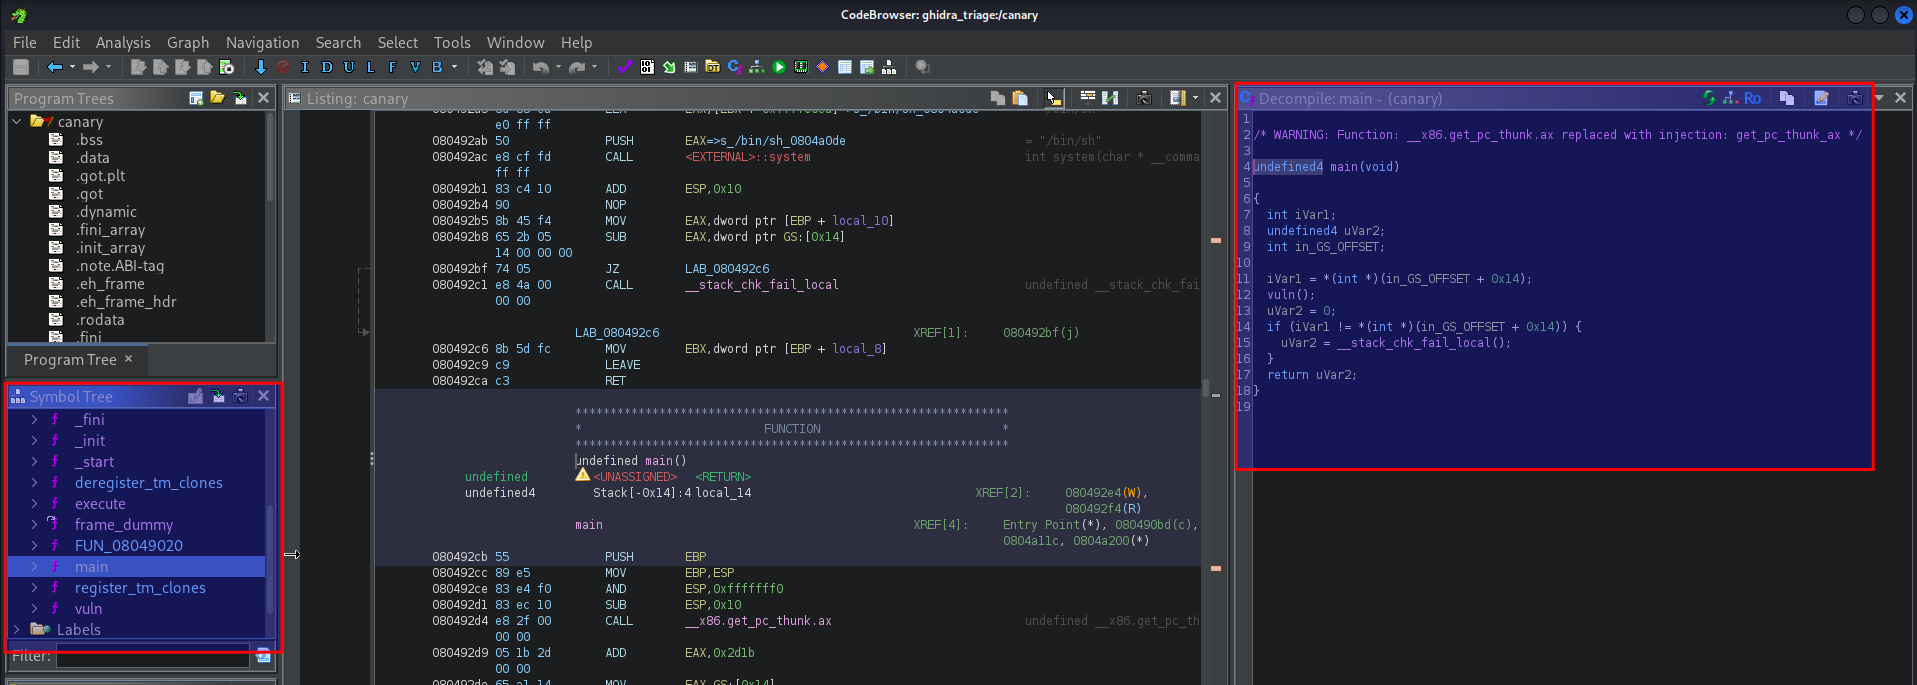
We can see in the left panel titled Symbol Tree, we see a collage of different functions present in the program, including main(), vuln() and execute().
- `main()
undefined4 main(void) |
Primarily just seems to be running vuln(). There seems to be a few interesting calls here, however we’ll get into this later.
vuln()
void vuln(void) |
There seems to be a bit more in this function, including a few printf statements for the program. We also see two instances of user input via puts asking us about the ASCII bird that was displayed prior.
Something already noteworthy is that we see two calls to gets(). We’ve looked into this function before - its vulnerable to a stack overflow due to invalid boundary checks in relation to the buffer its allocated. This function has historically been abused to overwrite addresses on the stack.
However, we have two gets() calls - but why is there is a printf statement only after the first gets() call? Both questions in the program seem to be asking regular questions and prompting the user for input. We’ll keep this in mind and move on.
execute()
void execute(void) |
This function seems to be relatively small, however it appears to be a custom function that is calling /bin/sh via system. The printf statement indicates to us that the developer of this program put this here to debug their program, the premise isn’t too important rather the fact that the system call is there.
Now that we have an idea of what the program is doing, let’s run the program to confirm what it’s doing.
└─$ ./serinus |
We can see that as expected, it prompts us twice for two different inputs, yet only the first is printed back to us.
Since we know that the gets() call is sent twice, let’s try overflowing the each of the calls to see what we get.
└─$ ./serinus |
We can see that after the second gets() call, we encounter a new error stack smashing detected. The program was terminated directly before the return statement.
After doing some research , we can see that the we successfully have overwritten memory addresses on the stack. This error is particularly different that a regular segmentation fault, and indicates to us that we have overwritten the stack canary.
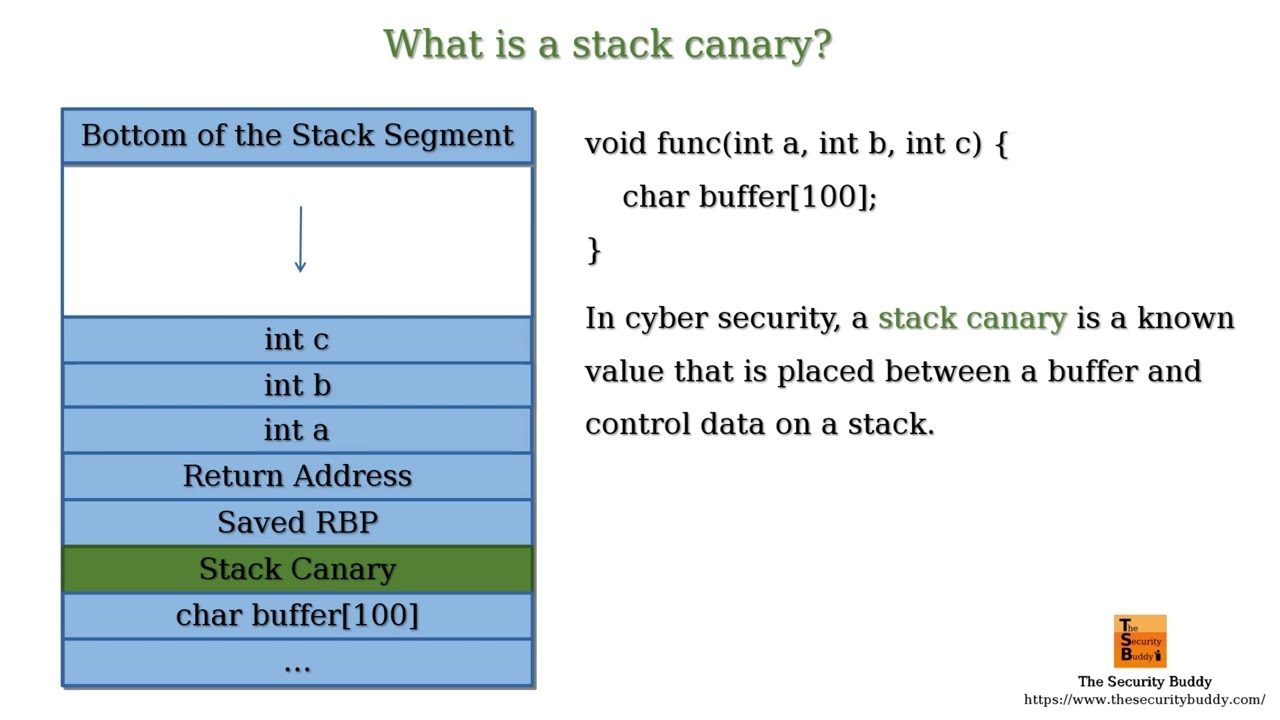
Stack Canary
The stack canary is a protection that was implemented into programs to prevent against stack-based buffer overflows, which is when we are overwrite addresses on the stack.
Stack canaries particularly work by inserting a static memory address at the very beginning of a function. The value isn’t checked until the very end of the function right before the return address, in which if the value is different than its original implementation - the program will immediately terminate. This means that if we overwrite the stack canary in any capacity and do not attempt to circumvent it, the program will terminate every time - preventing us from proceeding with our stack overflow.
This presents a hefty obstacle to exploiting our program as stated before, as the stack canary will prevent the overflow we are trying to achieve. Our goal would be to overflow the binary and point the EIP to the execute() function, however we’ll need to find a way to bypass this stack canary if we want to proceed forward.
We can see the stack canary being checked in each function in Ghidra as well, as seen below:
void vuln(void) |
The value local_10 is examined before the return function to see if it has been changed at all. If the value had been changed, the program will gracefully exit.
Let’s put this into GDB just so we can visualize what the stack canary will look like during execution flow. I’ll be using the pwndbg plugin that can be installed in GDB, as it comes with eased functionality to detect the specific address of the stack canary.
└─$ gdb -q serinus |
Let’s put a breakpoint at vuln() since this is the function that contains the stack canary.
pwndbg> break *vuln |
We can use the canary functionality to view the current stack canary (or canaries) in this function.
pwndbg> canary |
We can see that the current address for the stack canary contains the pointer 0xd65a1000, which is referred to by memory address 0xffffcabc.
Stack Canary Bypass - Format String Vulnerability
There are a few methods to bypassing the stack canary, however it isn’t something that you can inherently ignore. In order to bypass the stack canary, we’ll need to format our payload to include its value at the specific address it resides in before we actually push the rest of the payload.
But how exactly can we do that? We don’t know the stack canary’s value, as it’s randomized during every new execution of our program.
That’s when specifically that printf statement after our first gets() call will come in handy. As you may or may not have noticed, a printf statement is used after the first gets() call to print what we have entered in as our input. However, it just includes the raw variable and nothing else - that’s not how printf statements actually work.
If we wanted print out a variable in C using printf, we would need to utilize an argument that relates to the actual format of the string we want to print out. As an example, if the value we wanted to print out was a string, the printf statement would look like: printf("%s", my_string).
puts("\nDo you like my bird drawing?"); |
However, we inherently control the exact format of this string due to the fact that it just includes the variable itself. The printf statement will start to print addresses contained on the There is more info on this vulnerability out in the wild such as here- so I encourage you to look more into it if you’d like to.
Let’s run the program to see this in action. We’ll use %1 to print the first address on the stack and $p to indicate that we want to print out a pointer value.
└─$ ./serinus |
We can see that nil was printed out, meaning it has a NULL value. Let’s try the second pointer on the stack.
└─$ ./serinus |
We can see that this time it printed out 0x2. This means we can successfully leak addresses on the stack! Now what we’ll need to do is determine which index contains the canary value we’re looking for.
Canary Leak
Before we actually begin to enumerate stack pointers to determine which contains the canary value, we need to understand what they generally look like.
Stack canaries (at least in older programs like what we have here) generally contain an abnormal set of characters that do not start with ff that also end with two 00‘s. While this may not always be the case, it is generally used as a reference to determine what the stack canary may look like.
Let’s take a look back at GDB and examine the stack along with the canary to see where it might be. We need to make sure that we set our breakpoint right after the gets() call, as this is where the values on the stack will be when we use the format string vulnerability to enumerate them
pwndbg> break *0x080492a8 |
We can see that the current value for the canary is 0x2c0e0b00. Let’s take a look at the stack to see where this value is in relation to the stack pointer (ESP).
pwndbg> x/50x $esp |
Our stack canary looks to be at memory address 0xffffcdb0, and is the fourth pointer on that row.
We could just count down from these to determine the actual index of the stack canary, just remember that array values start with an index of 0.
0xffffcd60: 0xffffcd7c 0x00000000 0x00000002 0x00000000 <- 0-3 |
This means that our supposed index for the stack canary will be at index 23.
There are also other ways to enumerate that don’t involve GDB. We could simply iterate through payloads containing pointers 1-100 and automate the process, looking for key addresses that generally do not start with an ff and end in 00 like our initial hypothesis included. The below is a Python script that will print out each stack pointer using the format string vulnerability.
#!/usr/bin/python3 |
Note that all in particular this is doing is creating a new instance of the process and incrementing our formatted string argument from %1(-100)$p, sending it as an argument and then retrieving the output. We’re also including the pointer index that was used in that iteration at the very end of each string that we receive back.
└─$ python3 canary_leak.py |
We can see on index 23 that the address retrieved is now 0xafe2be00, which would follow our requirements for a potential canary address. We can almost confidently say that the stack canary address is located on the pointer index 23 due to the inconsistency with the other addresses around it.
Determining Padding Needed to the Return Address
Before we actual create our finalized exploit, we need to determine the padding that is required to get to the return address.
We don’t actually need to fuzz for this - as the value is already displayed in the disassembly in GDB, and it would also be a bit more complicated to fuzz for since we’d have to configure our canary leak (which we’re already going to do anyways).
Let’s start by figuring out how big the buffer allocation is in our program. We can see this in Ghidra in the vuln() function.
void vuln(void) |
The local_50 variable is whats passed into both gets() and printf(). We can assume that the size allocated to it (64) is the initial padding that we’ll need.
We’ll then add in the canary value following the buffer at pointer index 23. This will always represent the correct canary value as it is being retrieved from the first printf statement via the format string vulnerability
Then we’ll need to determine what pattern is required to reach the return address at that specific point. As I mentioned before, this is relatively easy to find in GDB, as the return address can be found directly after the second gets() call.
pwndbg> disas vuln |
We see that shortly after gets() - eax is filled with ebp-0xc.
0xc is equal to 12 in decimal, meaning that after our gets call and the canary, we have exactly 12 bytes between the canary address and the return address.
Lastly, we’ll need to push either shellcode or an address that will allow us to execute code following this 12-byte padding. As you may of noticed - this is where the function that executes /bin/sh comes into play. We can simply end our injection by having it return to this hidden function, granting us code execution as /bin/sh will give us an interactive shell.
So in all, our pattern should look like this:
padding(64) + canary(4) + padding(12 -> ret add) + execute_func(4) |
Exploit
Since we have our pattern, let’s utilize a bit of the code from the first challenge. Notably, we’ll include the local/remote functionality that pwntools provides us to ease the usability between local and remote exploits. We’ll also load the process and state the context of the binary.
#!/usr/bin/python3 |
We’ll need to then format the payload for the canary leak operation, abusing the format string vulnerability. Recall that the index for the canary pointer that we’re looking to print is at index 23.
payload = f'%23$p'.encode() |
We’ll then need to retrieve the actual canary address value. There’s multiple ways you can do this, I opted for splitting the strings retrieved by whitespace and filtering for a value that contains 0x, indicating an actual hexadecimal address.
leak = p.recvuntil(b"rate it", drop=True) |
To visualize how this would look, I’ve added a print statement just for debugging. This is what it would look like:
└─$ python3 exp.py |
We’ll then need to find the address necessary to return to the execute() function. pwntools also has easy usability into this - we can easily just search for the function address via elf.sym[execute].
syst = elf.sym['execute'] |
Finally, we’ll form our payload. Rather than just fill the buffer with \x42‘s like I did in the previous challenge, pwntools has a function that allows us to generate “cyclic” sequences of strings that will form 4 bytes in length for each amount provided.
Remember that our padding process to reach the return address is the following:
padding(64) + canary(4) + padding(12 -> ret add) + execute_func(4) |
Translation of this into Python code would look like the following:
payload = cyclic(64) + p32(canary) + cyclic(12) + p32(syst) |
Obviously canary being the canary address we received earlier and syst being the return address of the execute() function.
We’ll then just send it to the program and run p.interactive() to give us an interactive shell if we properly executed shellcode. The below is the entirety of the script up to this point:
#!/usr/bin/python3 |
I do enjoy this method of execution as it prevents us from needing to use our own custom shellcode, although we are particularly relying on the system(/bin/sh) functionality in the program. Nonetheless, let’s test this locally - I’ll also remove the print debug statement in our token loop.
└─$ python3 exp.py |
As you can see, our exploit worked! We now have an interactive shell and can play around with the system.
Let’s boot up the mimic docker container and see if we can reach the remote server and read the fake flag.
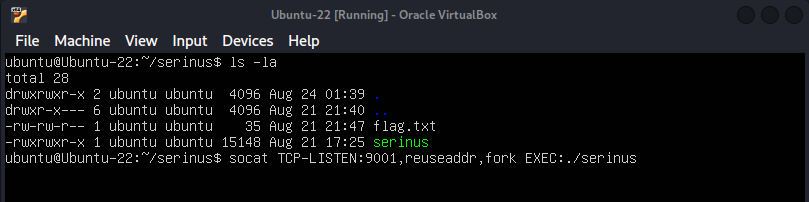
Let’s then run our exploit via the remote() function
└─$ python3 exp.py REMOTE (IP) 9001 |
And as we can see, we’ve read the flag! This would be the end of the challenge.
I want to thank the folks over at PSU for letting me create these two challenges for their 2025 Intro CTF. This helped me continue to practice my knowledge in the PWN category, and (although there were many headaches) I enjoyed every minute of developing them.